Page 1
Firefox Introduction
"Firefox" is anWindows comes with Microsoft's Internet Explorer built in, and is used by 67% of of Americans, compared to 25% for Firefox. Firefox is gaining in popularity all over the world, and is used by over 300 million people worldwide.
Firefox can easily be installed along with Internet Explorer. In fact, IE cannot be removed, it is a part of the Windows operating system. But Firefox can nicely be used anyway.
Firefox is less vulnerable to viruses, has better popup and ad blockers, and has a nice clean friendly feel. Many computer technicians use and recommend Firefox. In 2004, Microsoft's Internet Explorer experienced so many virus attacks, that the US federal government ordered its employees to switch to Firefox, as it is more resistant to attacks. IE has improved since, but Firefox is a well respected and important browser.
Which is better? Really, it eventually comes down to personal opinion. Some prefer Internet Explorer, some prefer Firefox. But you'll never know if you like Firefox unless you try it.
Click on the image for page view.
Page 3
Firefox Installation
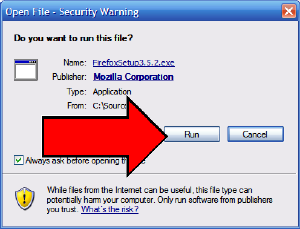
On the "Security Warning" screen, just click "Run".
Click on the image for page view.
Page 4
Firefox Installation (Continued)
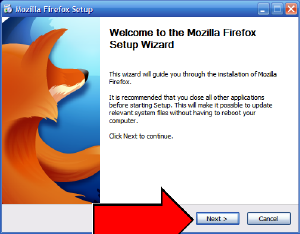
On the "Welcome" screen, click "Next".
Click on the image for page view.
Page 5
Firefox Installation (Continued)
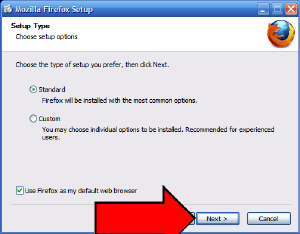
On the "Setup Type" screen, accept all defaults, and just click the "Next" button.
Click on the image for page view.
Page 6
Firefox Installation (Continued)
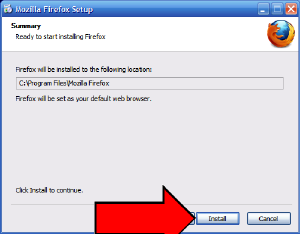
On the "Summary" screen, click "Install".
Click on the image for page view.
Page 7
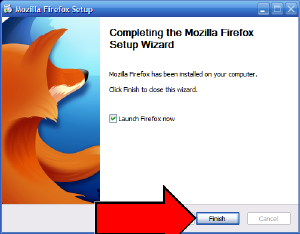
Firefox Installation (Finished)
On the "Completing" screen, click "Finished". This completes the installation of Firefox. While Firefox is OK as it comes, there are some nice additions that will enhance your enjoyment of Firefox. See the next pages for the initial configuration suggestions.
Click on the image for page view.
Page 8
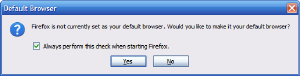
Firefox - Default Browser
When you open Firefox, you will get a message asking if you want Firefox to become your "default browser". What it is telling you is that probably Internet Explorer is currently your default browser, but would you like to change this to Firefox. I always answer "Yes", because I always want Firefox to be my default browser. However, if you are not sure, just click "No". Each time you open Firefox, you will again be asked this question. Keep answering "No", until you are comfortable with Firefox, and are ready to decide whether to go with Firefox or Internet Explorer. If you want to switch to Firefox, then just answer "Yes", and the question will go away. However, the next time you open Internet Explorer, then IE will ask you this same question. This is how browsers are built. You can only have one be a "default" at the same time. On the other hand, you can open and use either one whenever you like. Using one does not keep you from using the other. You can always use both.
Click on the image for page view.
Page 9
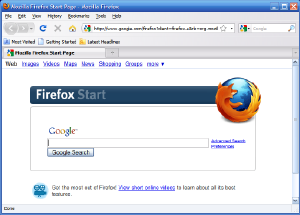
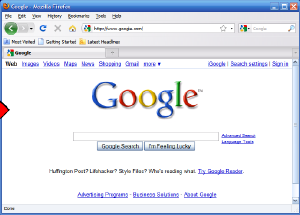
Firefox - How to Set Your Home Page
Your "Home Page" is the web page the browser automatically goes to when you first open it. There is a "House" icon in the upper menu bar. This "House" is suppose to represent "Home Page", because a "house" is your "home". So whenever you click the "House" icon, it will always take you to your Home Page. The idea of a Home Page is that is your "base of operations" when you are on the Internet.
Firefox starts with a suggested home page, but I never use it. Personally, I prefer to use Google for my home page, and it will be my example, but you can use the same method to set any website as your home page.
To Start, I will search for Google, and select it. You could also just put your home page website directly in Firefox address space.
Click on the image for page view.
Page 10
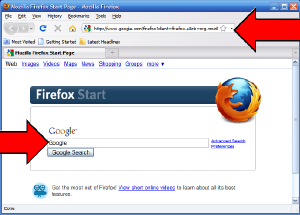
Firefox - Setting Home Page (Continued)
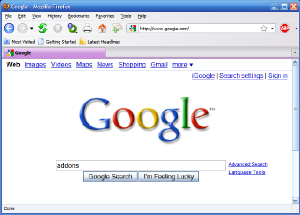
To get to the page I want as a home page, I put "Google" in the search field, and click "Google Search".
Click on the image for page view.
Page 11
Firefox - Setting Home Page (Continued)
This brings me to www.google.com, the page I want as my Home Page. Be sure before you continue that you are actually "on" the page you want as a Home Page.
Click on the image for page view.
Page 12
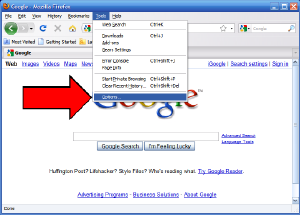
Firefox - Setting Home Page (Continued)
To set the current page to be your Home Page (and you can do this as often and whenever you want), just click on "Tools" in the upper menu bar, and select "Options".
Click on the image for page view.
Page 13
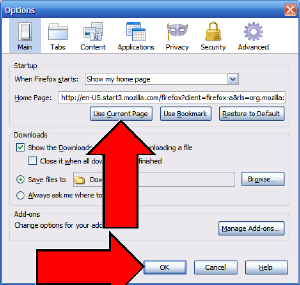
Firefox - Setting Home Page (Continued)
Click on "Use Current Page", and then click on "OK". This will set your Home Page.
Click on the image for page view.
Page 14
Firefox - Setting Home Page (Finished)
You now have set your Home Page. Anytime you close and open your browser, it will always return to this page. Also, anytime you are on the Internet, on any page, and you click the little "House" on the upper menu bar, it will always return you to your Home page.
The next step I usually take in setting up Firefox is to install some "Add Ons". The next page shows how to do this.
Click on the image for page view.
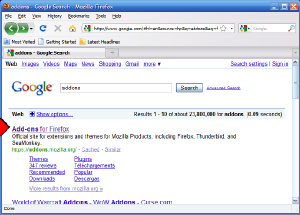
Page 15
Firefox - Installing Add-Ons - Step 1
I usually install the following add-ons:
- Colorful Tabs - Eye candy, makes tabs prettier
- Image Zoom - Lets you zoom pictures to larger size for easier viewing
- Crystalfox qute - Attractive theme
- PlainOldFavorites - Adds "Favorites" directly from Internet Explorer. Useful if you have extensive Favorites on IE.
- WOT - Web of Trust marks websites as safe or dangerous
- Adblock Plus - Blocks ads and popups excellently
To start, put "Addons" in Google Search, and select "Add-ons for Firefox".
Click on the image for page view.
Page 16
Firefox - Installing Add-Ons - Step 2
In the white box, as shown below, type in the name of the addon you are looking for. Then click on the green arrow on the right to find the add-on.
Click on the image for page view.
Page 17
Firefox - Installing Add-Ons - Step 3
Find the addon (in this example, "Colorful tabs", and click the green "Add to Firefox" icon.
Click on the image for page view.
Page 18
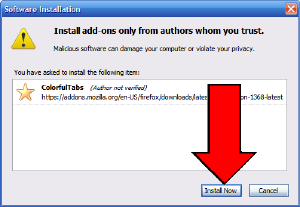
Firefox - Installing Add-Ons - Step 4
On the "Software Installation" screen, wait until "Install Now" appears, and then click on it.
Click on the image for page view.
Page 19
Firefox - Installing Add-Ons - Step 5
When the "Restart Firefox" button appears, then click on it. This will restart Firefox, with the new add-on installed.
Click on the image for page view.
Page 20
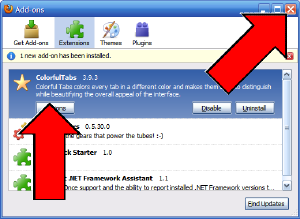
Firefox - Installing Add-Ons - Step 6
A popup window will appear named "Add-ons". This is an information popup only. Whenever you see it, just close it by clicking the red "X" in the upper right corner.
Click on the image for page view.
Page 21
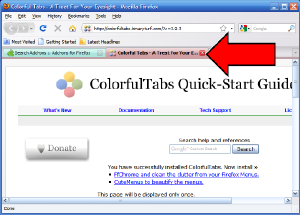
Firefox - Installing Add-Ons - Step 7
A new tab will open (look at the attractive colors :). Just click the red "X" on the right tab to close it. This will return you to the "Add-ons" screen. This completes the installation of one add-on. Repeat steps 1-7 for each of the add-ons. For the WOT add-on, it will ask you to "Accept" their license. Be sure to do that. Then you can close their tab two.
The last addon, "Adblock Plus" has one additional step. After you install it, the screen on the next page will show up.
Click on the image for page view.
Page 22
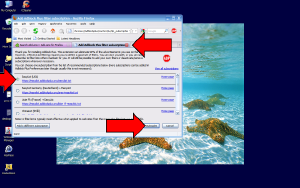
Firefox - Installing Add-Ons - Adblock Plus
On the "Subscription" page for Adblock Plus, leave the option button for the first list checkmarked, and click the "Subscribe" button at the bottom. This subscribes you to a good list of ad sites to be blocked.
This completes the installation of suggested addons.
Click on the image for page view.
Page 23
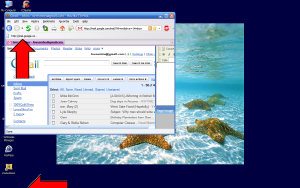
Firefox - Customizing
To customize the menus, put your cursor exactly where the red arrow points, in the blank area on the top menu bar, and RIGHT click your mouse, and select "Customize".
Click on the image for page view.
Page 24
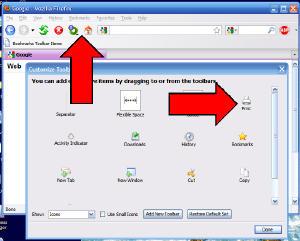
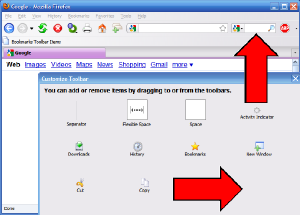
Firefox - Customizing (Continued)
On the popup box, you will find several Icons that we are interested in. I always copy the "Print" icon and the "New Tab" icon to the menu bar. Do this by finding the "Print" icon, and then "dragging" it by LEFT clicking on the "print" icon, holding the left-mouse button down, and drag the icon to the menu bar, just to the left of the little "House". Then let go the left mouse button. This should cause the "Print" icon to appear there. I then drag the "New Tab" icon to just to the right of the "House" icon. When I am done, it looks like the next page.
Click on the image for page view.
Page 25
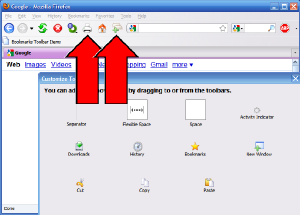
Firefox - Customizing (Continued)
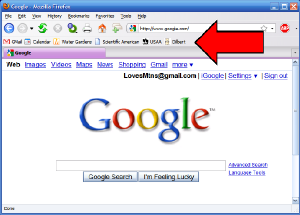
Here is what it looks like after I dragged the Print and New Tab icons.
Click on the image for page view.
Page 26
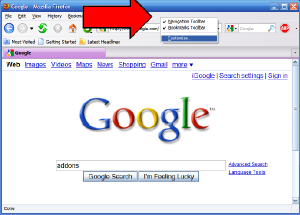
Firefox - Customizing (Continued)
The next step, is for those who decide to use Google for their home page. It is redundant to have a second "google" search bar above. So to remove it, just drag and drop it off the upper menu bar onto the popup box. Amazingly, it will just move. When complete, just click "Done" on the popup box, and it will go away. You can revisit it and customize as you desire.
Click on the image for page view.
Page 27
Firefox - Customizing (Finished)
This is what the customized screen now looks like. One more step to perform, and Firefox will be fully configured the way I like it :)
On the next page, we will customize the "Bookmarks Toolbar".
Click on the image for page view.
Page 28
Firefox - Bookmarks Toolbar
The bar that has "Most Visited", "Getting Started" and "Latest Headlines" is called the Bookmarks Toolbar. I LOVE this feature, but I start by getting rid of the ones that come with Firefox. To do this, just right click on "Lastest Headlines", and select "Delete". It will go away. Repeat this with "Getting Started" and "Most Visited". They will also go away, as shown on the next page.
Click on the image for page view.
Page 29
Firefox - Bookmarks Toolbar (Continued)
Now this blank space is available for whatever bookmarks YOU like.
Here are some of the things I will put on my Bookmarks Toolbar
- Gmail - My Gmail account website
- Calendar - My Google Calendar website
- WaterGardens - The www.watergardens55.org website
- Scientific American - Magazine website
- USAA - My bank and auto insurance company
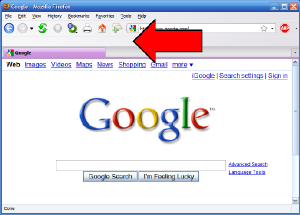
The first example will be to put my email site there, "Gmail". To do this, I first go to that site. Just click on "Gmail" on the Google page (it is just above the word "Google".)
Click on the image for page view.
Page 30
Firefox - Bookmarks Toolbar (Continued)
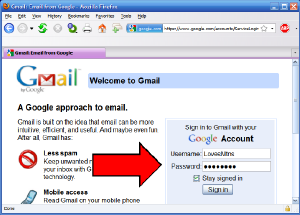
My first step is to GO to the website I want to bookmark. For Gmail, (my email), I also want to Sign In, so that I capture the "signed in" state.
Click on the image for page view.
Page 31
Firefox - Bookmarks Toolbar (Continued)
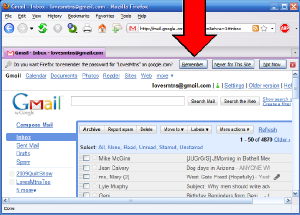
Firefox has a superb feature to save passwords. When you login to email or any other login, you will see a temporary line show up, as shown below, where it asks, "Do you want Firefox to remember the password for "LovesMtns" on google.com?", followed by three buttons, "Remember", "Never for this Site", and "Not Now".
For your home use, just click "Remember". If you are visiting others and using THEIR computers, then you would click, "Never for this Site", or if you just don't ever want it to remember a password for a specific site. If you aren't sure, just click, "Not Now", and Firefox will just ask you again the next time it comes up.
So, for me in this case, I am going to click "Remember".
Click on the image for page view.
Page 32
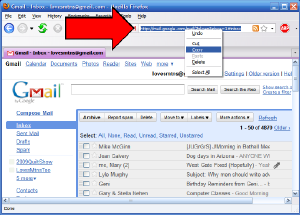
Firefox - Bookmarks Toolbar (Continued)
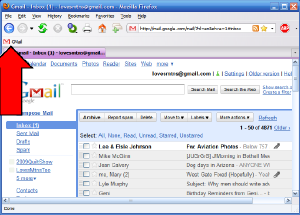
Once my email comes up the way I want, then I go to the Address Bar (shown below by the red arrow), and select the entire address. Then right click on the blue highlight, and select "Copy".
Click on the image for page view.
Page 33
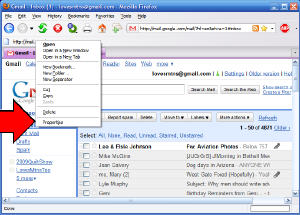
Firefox - Bookmarks Toolbar (Continued)
After "Copying", the next step is to put your cursor in a blank spot on the Bookmarks Toolbar, as shown below. Then right click and select "Paste". This will put the address on the Bookmarks Toolbar, as shown on the next page.
Click on the image for page view.
Page 34
Firefox - Bookmarks Toolbar (Continued)
Well, it is there, but it's not very pretty. So on the next page, we will begin to make it pretty.
Click on the image for page view.
Page 35
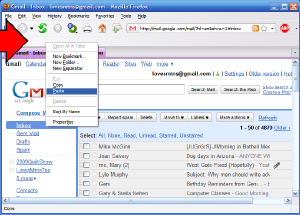
Firefox - Bookmarks Toolbar (Continued)
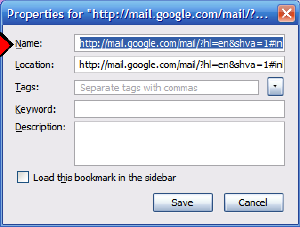
First, put your mouse cursor right on the new bookmark, and RIGHT click, and select "Properties". This will bring up a dialog box, as shown on the next page.
Click on the image for page view.
Page 36
Firefox - Bookmarks Toolbar (Continued)
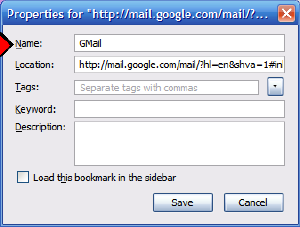
On the Properties screen, you will replace the "Name" field with a nice title. In my example, I will put the title "GMail" in the title field.
Click on the image for page view.
Page 37
Firefox - Bookmarks Toolbar (Continued)
Once a nice title has been entered, then click the "Save" button.
Click on the image for page view.
Page 38
Firefox - Bookmarks Toolbar (Continued)
Voila! There is now a nice attractive title on the Bookmarks bar. I will repeat this for each of the items I want to put on the Bookmark Toolbar. The final results will appear on the next screen.
Click on the image for page view.
Page 39
Firefox - Bookmarks Toolbar (Continued)
Wow! Now, I can instantly go to any of my favorite sites just by clicking the bookmark I just put there. This feature is for sites you go to a LOT.
For sites you don't visit very often, but want to mark, use regular Bookmarks or Favorites, just click on "Bookmarks" or "Favorites", and save your location the regular way.
Click on the image for page view.
Page 40
Firefox - Tips
Congratulations, you have nicely configured Firefox to work well for you. Tabs are a very nice feature. Here a few tips on using Firefox. This concludes the tutorial on Firefox. Enjoy!
- New Tabs - Tabs are a great addition to browsers. In Firefox, you can open a new tab by clicking the "New Tab" icon next to the "House", and then clicking on the "House" icon to go to your Home Page. Two quick steps and you have a new tab opened, without disturbing your original tab.
- Open Tab with Mouse Wheel - A little known feature of the Mouse Wheel is that it can act as a button. (This is equally true for Internet Explorer as Firefox). When you are on a link (shown by a blue word with an underline), push down with your Mouse Wheel until it "clicks". This action will open a new tab with the contents of the link you had selected. Very cool.
- Close a Tab with Mouse Wheel - You can close a tab by clicking the red "X" on the tab. However, you can also close it by placing the mouse cursor anywhere on the tab, and clicking the Mouse Wheel (push down until it clicks, without rolling it). Voila!, the tab will close.
- Increase/Decrease the Font Size - Words too hard to read? Hold down the Control Key on your keyboard (usually labeled "CTRL"), and roll your Mouse Wheel. You will instantly see the font size change. Rolling the wheel towards you makes the fonts smaller, and rolling the wheel away from you makes the fonts larger. Remember, you must hold the CTRL key down all the while you are doing this.
- Increase/Decrease Picture Sizes - Have you ever seen a photo on the Internet, but wanted to see it bigger, to see more detail? This feature requires the "Image Zoom" addon be installed. Position the mouse cursor on a photo on the Internet, hold down the RIGHT click button, and roll the Mouse Wheel. Rolling it towards you makes the picture bigger. Rolling it away from you makes the picture smaller. Right clicking on the picture, and just "clicking" the Mouse Wheel (that is, push straight down on it until it clicks, without rolling it), will cause the picture to return to its original size. So will refreshing the page.
|