Page 1
Fixing Redeye - Introduction
Modern cameras do a "pre-flash" which causes the pupil to constrict a little before the actual picture, which is reducing the amount of "redeye" pictures taken. But still they happen. The reason is that the light is low, a picture is taken with flash, but before the pupil can react, the photo is done. The red color comes from the red blood vessels in the back of the retina.
You can have delightful family photos, but they have that pronounced "redeye" effect. Fortunately, this is simple to fix with Paint.NET.
Page 2
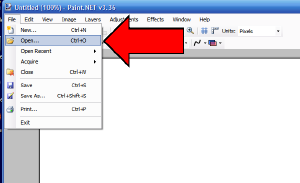
Opening a Photo
Click on "File", and select, "Open". We will start with "Redeye1.jpg".
Click on the image for page view.
Page 3
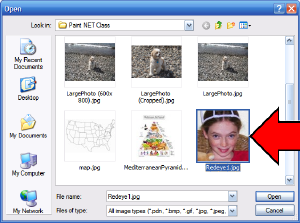
Select and Open Redeye1.jpg
Locate the "Redeye1.jpg" file and double click to open it, or click the "Open" button. You can also locate it in Windows Explorer, in your "Pictures" folder, or wherever it is, and right click on the picture, select "Send To", and then click on "Paint.NET".
Click on the image for page view.
Page 4
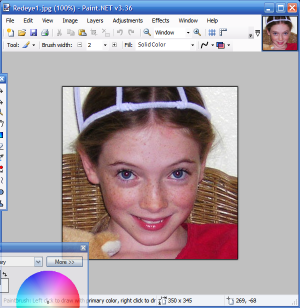
Picture with Redeye
This is a picture with mild redeye. We will go through the steps to fix it. There are three other pictures to practice on, with increasingly more severe cases of redeye. Paint.NET can fix them all :)
Click on the image for page view.
Page 5
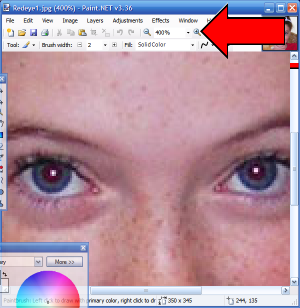
Zoom In
To fix redeye, you want to be zoomed in on the face in question. In this case, simply click the "plus" icon several times until the zoom level is 400%, as shown below. This makes it easy to work on the eyes.
Click on the image for page view.
Page 6
Choose "Oval Select"
From the "Tools" bar, click on the "Oval Select" icon, the third down on the left side.
Click on the image for page view.
Page 7
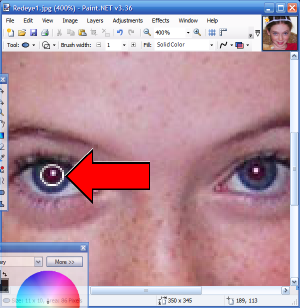
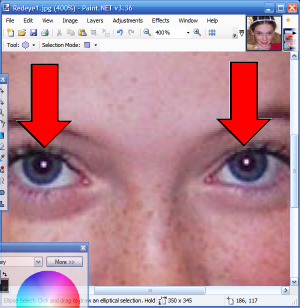
Select One Pupil
Put your cursor on the upper left corner of the pupil, slightly away from the pupil, and then depress the left mouse button, and "drag" the oval select over the pupil, so that the red portion is within the oval. Use the example below as a guide. The actual select lines are black, but I used white in the example below for greater clarity.
Click on the image for page view.
Page 8
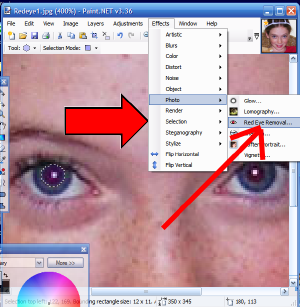
Select "Redeye Removal"
Once you have the pupil "selected", and the pulsating dotted line outlines the pupil, then click on "Effects" from the upper menu bar, go down and select "Photo", and then off the "Photo" select the submenu item "Red Eye Removal".
Click on the image for page view.
Page 9
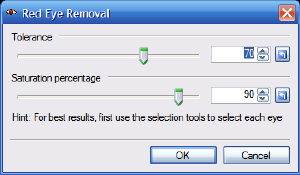
Red Eye Removal Dialog Box
The "Red Eye Removal" dialog box will come up. For each specific case, you will need to move the two slider bars experimentally, to see what looks best. In this case, just move the top slider bar to the left, until the value goes from 70 to 5.
Click on the image for page view.
Page 10
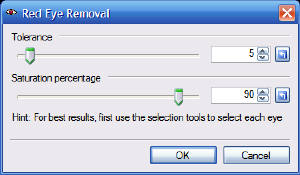
Red Eye Removal Dialog Box (Continued)
You can actually see the results in the red eye, of moving these slider bars. This setting will work pretty well for THIS case of red eye, but for other cases, you will need to experiment with BOTH bars, until you get results you find acceptable.
The goal is to change the bright red color to either a dark or neutral color, or at the least, to a faint dull reddish color instead of bright red. You can decide what you like the best in each case.
Click on the image for page view.
Page 11
Done - Red Eye Removed From Left Eye
This has successfully removed the "Red Eye" effect from the left eye. Repeat these steps exactly with the right eye. Notice that the "Red Eye Removal" dialog box "remembered" the settings for the left eye. It has been my experience that in most cases, whatever worked for the left eye is probably about right for the right eye, so I don't change them, but use them for the right eye also.
Click on the image for page view.
Page 12
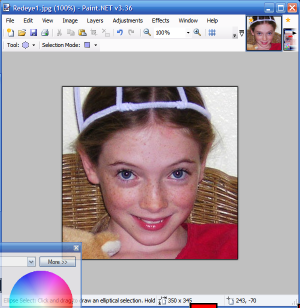
Finished Red Eye Removal
Now put the "Zoom" back to the normal 100%. Look at the results. The "red eye" has been removed. This makes the picture, and the person in it, look much more natural.
Now for more practice, remove the red eye effect from the following additional photos:
- Redeye2.jpg
- Redeye3.jpg
- Redeye4.jpg
This completes the tutorial on red eye removal. Good luck.
Click on the image for page view.
|